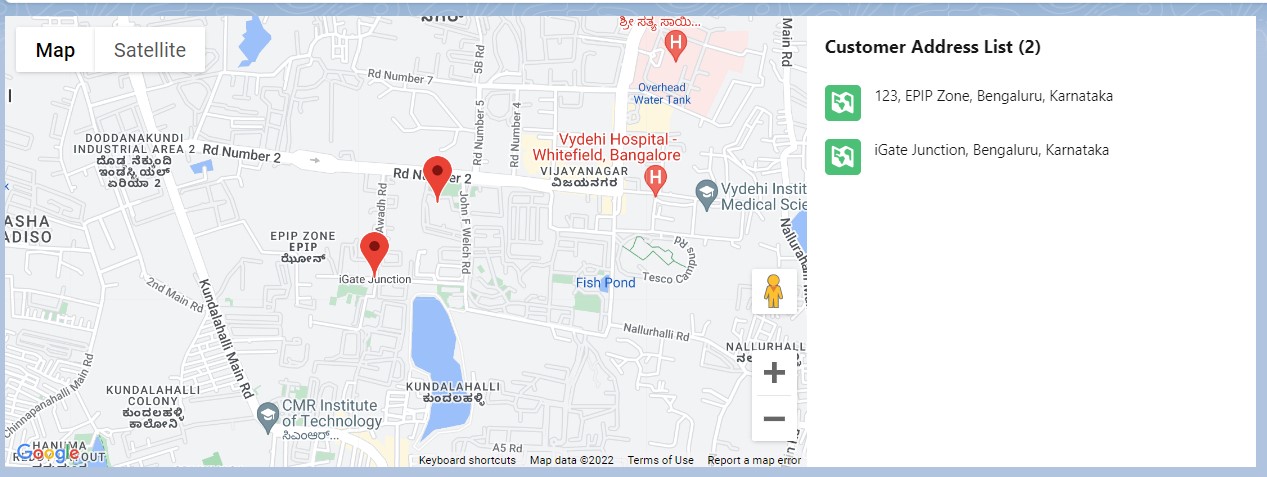
In our previous article, we have seen how to show a single address in the lightning-map. In this blog post, we implement multiple addresses in a lightning-map base component as shown below.
Create a lightning
web component
nSP_Location_Map.html
<template>
<lightning-map
map-markers={mapMarkers}
markers-title="Customer
Address List"
style="background-color: white"
zoom-level="15"
>
</lightning-map>
</template>
nSP_Location_Map.js
import { LightningElement, api, wire, track } from 'lwc';
import { getRecord } from 'lightning/uiRecordApi';
import BILLING_COUNTRY from '@salesforce/schema/Account.BillingCountry';
import BILLING_STATE from '@salesforce/schema/Account.BillingState';
import BILLING_CITY from '@salesforce/schema/Account.BillingCity';
import BILLING_STREET from '@salesforce/schema/Account.BillingStreet';
import BILLING_POSTALCODE from '@salesforce/schema/Account.BillingPostalCode';
import SHIPPING_COUNTRY from '@salesforce/schema/Account.ShippingCountry';
import SHIPPING_STATE from '@salesforce/schema/Account.ShippingState';
import SHIPPING_CITY from '@salesforce/schema/Account.ShippingCity';
import SHIPPING_STREET from '@salesforce/schema/Account.ShippingStreet';
import SHIPPING_POSTALCODE from '@salesforce/schema/Account.ShippingPostalCode';
export default class NSP_Location_Map extends LightningElement {
@api recordId;
@track mapMarkers;
@wire(getRecord, {
recordId: '$recordId',
fields: [BILLING_COUNTRY, BILLING_STATE, BILLING_CITY, BILLING_STREET, BILLING_POSTALCODE,
SHIPPING_COUNTRY, SHIPPING_STATE, SHIPPING_CITY, SHIPPING_STREET, SHIPPING_POSTALCODE]
})
fetchAddressDetails({data, error}){
if(data){
this.mapMarkers = [
{
location: {
Country: data.fields.BillingCountry.value,
State: data.fields.BillingState.value,
City: data.fields.BillingCity.value,
Street: data.fields.BillingStreet.value,
PostalCode: data.fields.BillingPostalCode.value
},
},
{
location: {
Country: data.fields.ShippingCountry.value,
State: data.fields.ShippingState.value,
City: data.fields.ShippingCity.value,
Street: data.fields.ShippingStreet.value,
PostalCode: data.fields.ShippingPostalCode.value
},
}
];
}else if(error){
console.log('error' + error);
}
}
}
nSP_Location_Map.js-meta.xml
<?xml version="1.0" encoding="UTF-8"?>
<LightningComponentBundle xmlns="http://soap.sforce.com/2006/04/metadata">
<apiVersion>51.0</apiVersion>
<isExposed>true</isExposed>
<targets>
<!-- <target>lightning__AppPage</target>
-->
<target>lightning__RecordPage</target>
<!--
<target>lightning__HomePage</target> -->
</targets>
</LightningComponentBundle>
Please note, billing and shipping addresses are mapped from
different standard fields of the Account object.
Deploy or save the newly created lightning web component to the sandbox, and add it to the account record page in the lightning app builder.
Save your changes, navigate to the account record and verify the lightning-map displaying multiple addresses.
If you find any
issues, debug the lightning web component or post it in the comments section below.
Please subscribe to our community page for the latest blog post updates.
Until then...


0 Comments