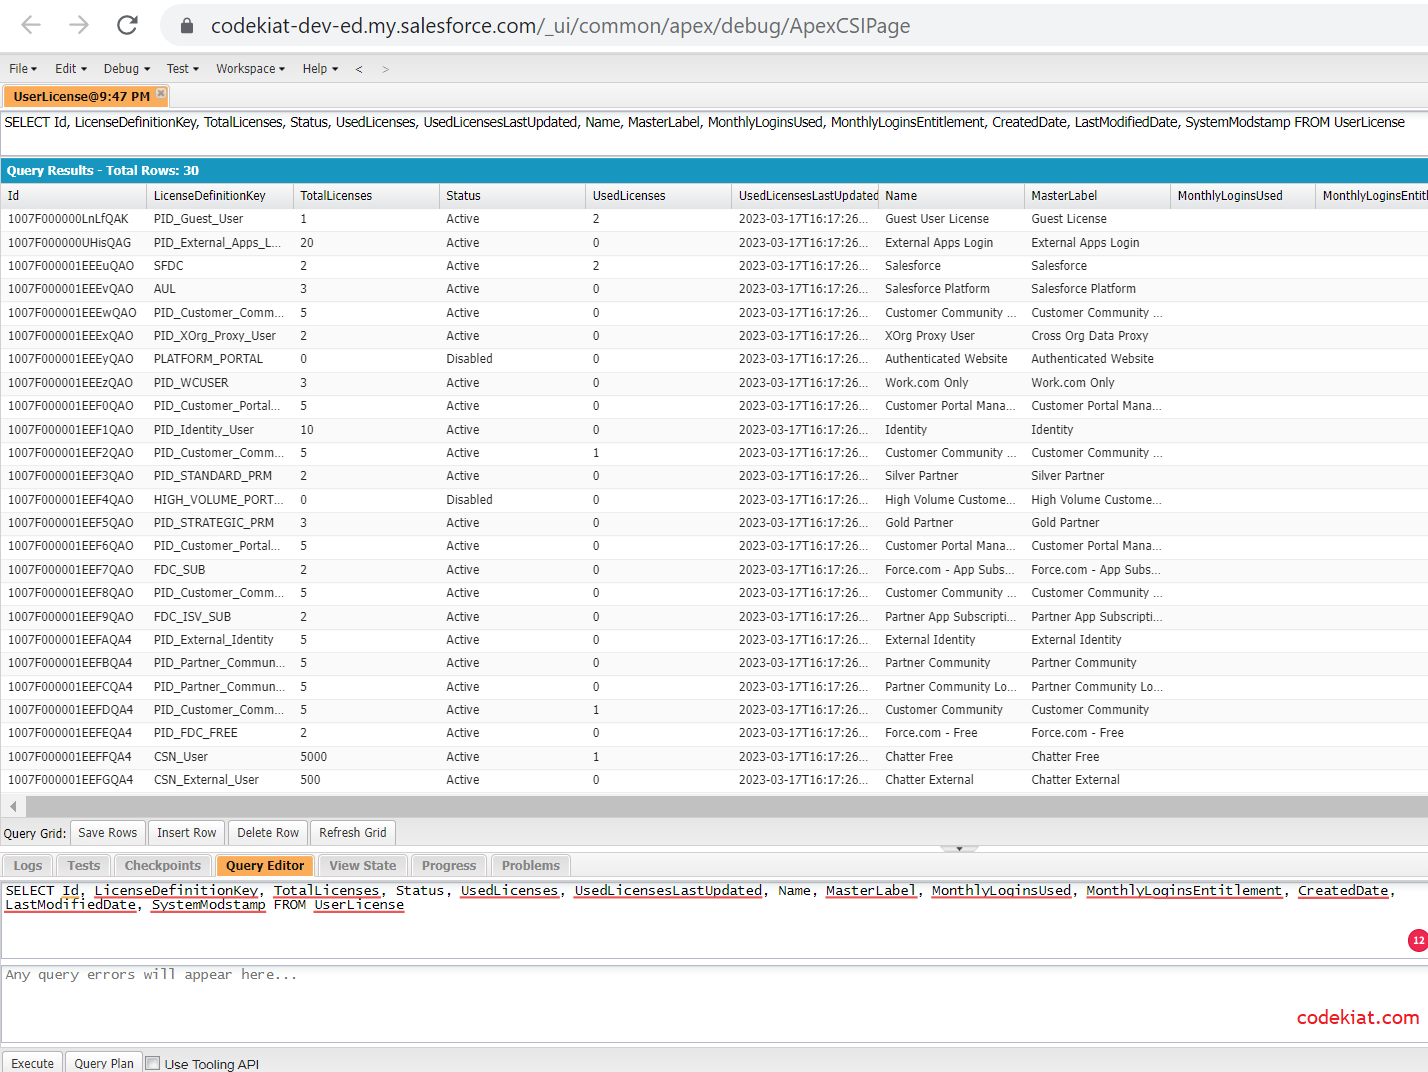
Retrieve total
and used licenses in Salesforce org using the following SOQL query.
SELECT Id, LicenseDefinitionKey, TotalLicenses, Status, UsedLicenses, UsedLicensesLastUpdated, Name, MasterLabel, MonthlyLoginsUsed, MonthlyLoginsEntitlement, CreatedDate, LastModifiedDate, SystemModstamp FROM UserLicense
TotalLicenses and UsedLicenses give an idea about how many licenses are left for assignment.
In addition to the above query, we can also get the license information from the setup.
Log in to Salesforce > Go to setup > Search for Company in the Quick Find search box (1) > Navigate to Company Information (2) > User Licenses
It is crucial to regularly monitor the available licenses to ensure the organization can acquire new licenses before reaching the limit.
To streamline the process, consider implementing automation to send regular weekly or monthly reports on available licenses, eliminating the need for admins to log in regularly and manually check the details.
To set up an automation that sends license details to an admin email addresses at regular intervals, follow these three steps:
Step 1: Create Apex Handler Class (Name: LicenseInfoNotificationHandler)
public class LicenseInfoNotificationHandler {
if(!licenseList.isEmpty()){
list<string> emailIds = new list<string>();
}
//send an email
if(!emailIds.isEmpty()){
Organization orgDetails = [SELECT Id, Name FROM Organization WHERE Id = :UserInfo.getOrganizationId() limit 1];
email.setHtmlBody(CreateHTMLBody(licenseList));
try {
}
}
}
public static string CreateHTMLBody(list<UserLicense> licenseList){
String htmlBody = '<table border="1" style="border-collapse: collapse"><tr>'+
//close table...
htmlBody += '</table>';
}
Step 2: Create Schedulable Apex Class (Name: LicenseInfoNotificationSchedule)
public class LicenseInfoNotificationSchedule implements Schedulable {
}
}
Step 3: Schedule the class
Log in to Salesforce > Go to setup > Search with the apex in the quick find search box (1) > Select Apex Classes (2) and click Schedule Apex button (3)
After filling out all the necessary details, click the Save button.
Check the status of the job in the All-scheduled jobs or Apex jobs screen
You can also schedule this class from the Anonymous window of a developer console. Example code below.
LicenseInfoNotificationSchedule m = new LicenseInfoNotificationSchedule();
Result
The license information received in the email looks as belowConsiderations
- Using a custom metadata type to store email addresses can eliminate the need to modify code when sending reports to new email addresses. By updating the email address within the custom metadata type, your code can retrieve it automatically. Find step-by-step instructions to create a custom metadata type in Salesforce Lightning.
- If you prefer not to see all the user licenses in the report, you can apply a filter to the userlicense object query. This will allow you to limit the results to only the licenses you want to see, simplifying the report and reducing unnecessary data.
- Check your organization's policies before sending the license information to external email addresses
Wrap up
In conclusion,
being aware of your organization's available licenses in Salesforce Lightning
is vital for effective resource allocation. By utilizing the steps outlined in
this article, you can efficiently check the number of licenses at your
disposal.
If you have any questions or comments, please leave them in the comments section below.
Until then…


.png)

0 Comments